Guide to Learning the Amazon Rekognition Platform and API

Introduction

Amazon Rekognition is a service that allows developers to add image and video analysis to their applications. With it, you can detect objects, scenes, faces, identify celebrities, and even spot potentially unsafe content. This guide will walk you through the basics of the platform and its API.

Prerequisites

  1. AWS Account: Before diving in, make sure you have an Amazon Web Services (AWS) account.
  2. AWS CLI: Install the AWS Command Line Interface (CLI). It’s a handy tool for interacting with AWS services.
  3. Programming experience: Familiarity with a programming language like Python, JavaScript, or Java will be helpful.

1. Getting Started

1.1. Setting Up Your Environment

  1. IAM: Before you begin, set up an IAM user in the AWS Console with the necessary permissions to access Rekognition. Always avoid using root user credentials.
  2. AWS SDK: Amazon Rekognition is accessible via the AWS SDKs available for various languages. Depending on your language of choice, you may want to set up the SDK. For this guide, we’ll use Python with the Boto3 library.

1.2. Exploring the Console

Amazon Rekognition provides a web-based console where you can try out many of its features without writing any code. Before diving deep into the API:

  1. Navigate to the Amazon Rekognition Console in your AWS Dashboard.
  2. Explore the various options available, like image and video analysis.

2. Diving into the API

2.1. Analyzing Images

There are several functions provided by the Rekognition API to analyze images:

  1. DetectLabels: Detect objects, people, scenes, and activities.
  2. DetectFaces: Detect facial features and attributes.
  3. CompareFaces: Compare two faces and see how similar they are.
  4. RecognizeCelebrities: Identify famous individuals in your images.

Example: Detecting Labels using Python and Boto3

import boto3 client = boto3.client('rekognition') response = client.detect_labels( Image={ 'S3Object': { 'Bucket': 'your-bucket-name', 'Name': 'your-image-name.jpg' } }, MaxLabels=10 ) print(response['Labels'])

2.2. Working with Videos

Rekognition’s video analysis functions similarly to its image functions, but due to the asynchronous nature of video analysis, you’ll often start an analysis task and get results later.

Some key video functions include:

  1. StartLabelDetection
    • Purpose: Initiates the asynchronous detection of labels in a video.
    • How it Works: Once started, this function processes video frames to identify objects, scenes, and activities, such as “bicycle,” “tree,” or “walking.”
    • Applications: Can be used in video surveillance for object monitoring, content generation for tagging video content, and more.
  2. StartFaceDetection
    • Purpose: Begins the asynchronous detection of faces within a video.
    • How it Works: This function scans video frames to identify and locate faces. For each detected face, it returns the position and facial attributes such as age range, emotions, and gender.
    • Applications: Useful in situations like crowd monitoring, audience reactions during events, and security applications.
  3. GetLabelDetection
    • Purpose: Retrieves the results of the label detection operation once it’s complete.
    • How it Works: After you initiate label detection using StartLabelDetection, you can use this function to obtain the detected labels, their confidence scores, and their timings in the video.
    • Applications: Post-processing of video data, generating insights or reports based on video content, and refining content recommendation systems.
  4. GetFaceDetection
    • Purpose: Retrieves the results of the face detection operation once it’s done.
    • How it Works: After starting face detection with StartFaceDetection, this function allows you to get details of the detected faces, their attributes, and their timings in the video.
    • Applications: Analyzing audience engagement, monitoring restricted areas for unauthorized access, and in-depth video analytics.

3. Advanced Features

3.1. Custom Labels

With Amazon Rekognition Custom Labels, you can train your own machine learning model to detect specific items in images tailored to your needs.

  1. Create a dataset: You’ll need a labeled dataset.
  2. Train your model: Use the Rekognition console to train your model.
  3. Test & deploy: Once your model is trained, you can test and deploy it.

3.2. Face Collections

You can create collections of faces, which lets you search for faces in an image that match those in your collection. Useful functions include:

  1. CreateCollection
    • Purpose: Creates a new collection of faces.
    • How it Works: A collection is a container for storing face metadata. Once you create a collection, you can add face data to it.
    • Applications: Building a face database for facial recognition systems, creating a whitelist/blacklist of faces for security systems.
  2. IndexFaces
    • Purpose: Adds face data to the specified collection.
    • How it Works: This function detects faces in an input image and adds them to the specified collection. It returns face records for each face detected, which includes a face ID and a bounding box.
    • Applications: Populating a database for a facial recognition system, storing face data for repeat visitors or customers.
  3. SearchFaces
    • Purpose: Searches for matching faces in the specified collection.
    • How it Works: You provide a source face, and the function searches for faces in the collection that look similar. It returns a ranked list of faces with similarity scores.
    • Applications: Finding a person of interest in a database, verifying identity using facial data, and ensuring only authorized personnel access specific areas.

4. Best Practices & Tips

  1. Stay within limits: Rekognition has API rate limits. Familiarize yourself with them to avoid throttling.
  2. Optimize costs: Only request features you need. For instance, if you only need object labels, don’t request face detection.
  3. Handle failures: Always add error handling in your code to manage potential API failures.

5. Wrapping Up

Amazon Rekognition offers a powerful set of tools for developers interested in image and video analysis. Like any AWS service, the key is understanding how its different features fit together and mapping them to your specific needs. With hands-on experimentation and real-world applications, you’ll become proficient in no time. Happy coding!

Comprehensive Tips for Maximizing Twitter Engagement in 2023

Bullet Point List of Twitter Tips

  1. Know your audience using Twitter’s analytics tools to align content with their preferences.
  2. Prioritize content quality:
    • Stay succinct with the 280-character limit.
    • Remain relevant to current events and trending topics.
  3. Likes are more influential in the Twitter algorithm than retweets or replies.
  4. Maintain a stellar Reputation Score to safeguard your content’s ranking.
  5. Hashtag judiciously; ideally, use just one per tweet.
  6. Proactively engage with followers, responding to comments, and initiating discussions.
  7. Consistently post and optimize timing based on when your audience is most active.
  8. Include CTAs in your tweets to drive interactions.
  9. Cross-promote your Twitter on other platforms and mediums.
  10. Consider Twitter ads for wider visibility and engagement.
  11. Engage in Twitter chats relevant to your niche.
  12. Boost content visibility by engaging with trending topics.
  13. Incorporate images or videos to amplify the reach of your tweets.
  14. Be cautious with external links to prevent potential spam flags.
  15. Monitor and optimize your follower-to-following ratio.
  16. Ensure your tweets are free from unrecognized or misspelt words.
  17. Consistently produce content within your identified niche.
  18. Contemplate a Twitter Blue subscription for a potential reach boost.

Always prioritize content that provides value to your audience for optimal engagement.

Tips above are taken from combining the soft and hard recommendations from the following articles:

Guide to Posting on Twitter based on the 2023 Source Code Disclosure

Twitter has recently made the source code for its recommendation algorithm public, revealing the elements it considers when curating your personalized “For You” timeline.

Let’s delve into the top 10 insights we’ve gained about the Twitter algorithm and the strategies you should employ to achieve virality:

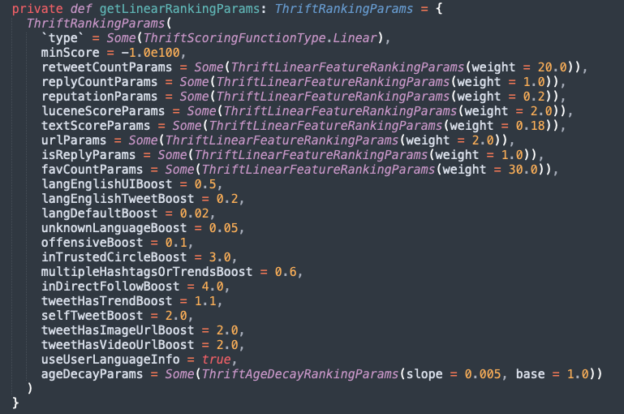
  1. Prioritize Likes: Likes contribute more significantly to your Tweet’s reach than retweets or replies. Aim to create content that encourages your followers to hit the ‘like’ button. This boosts your Tweets by 30x as compared to Retweets (20x boost) or Replies (1x boost).
  2. Maintain a Positive Reputation: Twitter’s algorithm assigns a Reputation Score to your account. Ensure your content isn’t offensive or harmful, as any negative user actions like blocking, reporting, muting, or unfollowing can lead to a downranking of your content.
  3. Minimize Hashtag Use: Excessive use of hashtags can lead to your content being downranked. While hashtags originated on Twitter, it’s recommended to use a maximum of one hashtag per tweet, or none at all, if possible.
  4. Engage with Trending Topics: Posting about current trends can give your content a boost. Be aware of what’s trending and find creative ways to incorporate these topics into your tweets.
  5. Use Visual Media: Adding images or videos to your tweets doubles their visibility according to the algorithm, as compared to text-only content.
  6. Limit External Links: External links in tweets could be flagged as spam, leading to downranking. Unless your content has high engagement, it’s best to limit the use of external links.
  7. Maintain a Healthy Follower-to-Following Ratio: Having a disproportionately low number of followers compared to the number of accounts you follow can lead to a downranking of your account. Unfollow accounts that aren’t relevant to you to maintain a balanced ratio.
  8. Check Your Spelling: Tweets with unrecognized or misspelt words can significantly lower your ranking. Make sure to proofread your tweets before posting.
  9. Stick to Your Niche: The algorithm categorizes accounts based on their content. Posting about topics outside of your typical subject matter can lead to downranking.
  10. Consider Twitter Blue: Twitter Blue subscribers receive a boost of 2-4x on their tweets depending on whether the viewer is in the same network/niche.

    Thanks to this article for the summary: https://genflow.com/blogs/how-the-twitter-algorithm-works-in-2023


Guide to boosting engagement on Twitter

Here are some tips on how to generate engagement on Twitter:

1. Understand Your Audience:

The first step to creating content that your followers will love is to understand who they are and what they want. Use Twitter’s built-in analytics tools to learn more about your followers’ demographics, interests, and online activity patterns. This will help you tailor your posts to your specific audience, increasing the chances of engagement.

2. Create Quality Content:

The quality of your content is one of the most important factors that can increase engagement. Here are a few tips:

  • Use clear and concise language. Tweets are limited to 280 characters, so make every word count.
  • Be timely. Posting about current events, trending topics, or time-sensitive news can boost your visibility.
  • Incorporate relevant hashtags to help users find your content, but avoid hashtag stuffing.
  • Include visuals like images, GIFs, and videos to attract attention. Tweets with visuals typically get more likes and retweets.

3. Engage Directly with Your Audience:

If you want engagement, you need to engage. Respond to comments on your posts, join conversations related to your niche, and don’t hesitate to retweet or like others’ posts. You can also ask questions or create polls to encourage your followers to interact with you.

4. Post Regularly and at the Right Time:

Twitter is a fast-paced platform, and for your content to be seen, you need to post regularly. However, avoid spamming your followers with too many tweets in a short span of time. Use your analytics to understand when your followers are most active and schedule your posts for those times.

5. Use Calls to Action (CTAs):

Don’t be afraid to ask your followers to engage with your posts. Simple CTAs like “Retweet if you agree”, “Like if you found this helpful”, or “Share your thoughts in the comments” can significantly increase engagement.

6. Cross-Promote Your Twitter Account:

Promote your Twitter account on your other social media platforms, website, email newsletters, etc. This can help you reach more people and increase your follower count, which can ultimately lead to more engagement.

7. Utilize Twitter Ads:

If you have the budget, Twitter ads can be a great way to boost visibility and engagement. Twitter offers a variety of ad options, including Promoted Tweets, Follower Ads, and Trend Takeover, which can help you reach a wider audience.

8. Participate in Twitter Chats:

Twitter chats are scheduled, public conversations that happen on Twitter, usually around a specific topic. Participating in Twitter chats related to your niche can help you engage with your community, make new connections, and increase your visibility.

Remember, the key to generating likes, retweets, and engagement on Twitter is to create content that provides value to your audience. Keep your content relevant, engaging, and timely, and you’ll see an increase in engagement in no time.

Posts on Page WordPress Widget Plugin

I was disappointed to find that there wasn’t a “Posts on Page” widget plugin for WordPress. I wanted something that would:

  1. Display a list of all the posts on a page
  2. The title is optional
  3. Also, add “Recent Posts”
  4. Again the recent posts title could be optional
  5. The number of recent posts could be fixed or variable based on the number of posts on the page (I use 5 fixed)
  6. The recent posts could be selected by category, by tag, or by both – so you can effectively add “featured” posts
  7. Display all as a <ul> list (or not)

So I learned how to create a WordPress plugin that creates a widget, there’s a tutorial here: https://horkan.com/2023/08/08/creating-a-wordpress-widget-plugin-tutorial

And then built my own. It should be over there on the right, doing its job.

You can download the widget from here: http://horkan.com/wp-content/uploads/2023/08/posts-on-page-widget.zip

The code is below. I’ll add it to GitHub later.

<?php
/**
 * Plugin Name: Posts on Page Widget
 * Plugin URI: https://horkan.com/posts-on-page-wordpress-widget-plugin 
 * Description: A widget that displays a list of all posts displayed on the current page.
 * Version: 1.0
 * Author: Wayne Horkan
 * Author URI: https://horkan.com
 * License: MIT
 */

 // Register and load the widget
function posts_on_page_widget_load() {
    register_widget( 'Posts_On_Page_Widget' );
}
add_action( 'widgets_init', 'posts_on_page_widget_load' );

class Posts_On_Page_Widget extends WP_Widget {
    public function __construct() {
        $widget_options = array( 
            'classname' => 'posts_on_page_widget',
            'description' => 'This is a plugin developed by Wayne Horkan that displays a list of all posts displayed on the current page.',
        );
        parent::__construct( 'posts_on_page_widget', 'Posts on Page Widget', $widget_options );
    }

    public function widget( $args, $instance ) {

        if(isset($instance['title'])) {
            
            $title = apply_filters( 'widget_title', $instance[ 'title' ] );
            echo $args['before_widget'] . $args['before_title'] . $title . $args['after_title'];
        }

        global $posts;

        if (empty($posts)) {
            $posts = get_posts();
        }

        $total_posts_to_show = count($posts);
        $displayed_posts     = 0;

        if ($instance['use_list']) {
            echo '<ul>';
            foreach ($posts as $post) {
                if($displayed_posts < $total_posts_to_show) {
                    echo '<li><a href="' . get_permalink($post) . '">' . $post->post_title . '</a></li>';
                    $displayed_posts++;
                }
            }
            echo '</ul>';
        } else {
            foreach ($posts as $post) {
                if($displayed_posts < $total_posts_to_show) {
                    echo '<a href="' . get_permalink($post) . '">' . $post->post_title . '</a><br/>';
                    $displayed_posts++;
                }
            }
        }

        if ($instance['fixed_variable_recent']) {

            $total_posts_to_show = isset($instance['total_posts']) ? $instance['total_posts'] : 0; # count($posts);

            if ($total_posts_to_show != 0) {

                $total_posts_to_show = $total_posts_to_show + $displayed_posts; 

            }


        } else {

            $total_posts_to_show = isset($instance['total_posts']) ? $instance['total_posts'] : 0; # count($posts);

            if($displayed_posts < $total_posts_to_show) {

                $total_posts_to_show = $total_posts_to_show - $displayed_posts;

            } else {

                $total_posts_to_show = 0; 
            }

        }

        if($instance['show_recent'] && $displayed_posts < $total_posts_to_show) {
            $recent_posts_args = array(
                'numberposts' => $total_posts_to_show - $displayed_posts,
                'offset' => 0,
                'category' => 0,
                'orderby' => 'post_date',
                'order' => 'DESC',
                'include' => '',
                'exclude' => '',
                'post_status' => 'publish',
                'suppress_filters' => true,
            );

            if(isset($instance['recent_category']) && isset($instance['recent_tag'])) {
                $recent_posts_args['category_name'] = $instance['recent_category'];
                $recent_posts_args['tag'] = $instance['recent_tag'];
            } elseif(isset($instance['recent_category'])) {
                $recent_posts_args['category_name'] = $instance['recent_category'];
            } elseif(isset($instance['recent_tag'])) {
                $recent_posts_args['tag'] = $instance['recent_tag'];
            }

            $recent_posts = wp_get_recent_posts( $recent_posts_args, ARRAY_A );

            echo '<br/>';
            echo '<br/>';
            echo '<br/>';

            if(isset($instance['recent_title'])) {
                $recent_title = $instance['recent_title'];
                echo $args['before_title'] . $recent_title . $args['after_title'];
            } 

            if($instance['use_list']) {
                echo '<ul>';
                foreach ($recent_posts as $post) {
                    echo '<li><a href="' . get_permalink($post['ID']) . '">' . $post['post_title'] . '</a></li>';
                }
                echo '</ul>';
            } else {
                foreach ($recent_posts as $post) {
                    echo '<a href="' . get_permalink($post['ID']) . '">' . $post['post_title'] . '</a><br/>';
                }
            }
        }

        echo $args['after_widget'];
    }

    // Form method
    public function form( $instance ) {
        $title = ! empty( $instance['title'] ) ? $instance['title'] : 'Posts on Page';
        $use_list = ! empty( $instance['use_list'] ) ? $instance['use_list'] : true;
        $recent_title = ! empty( $instance['recent_title'] ) ? $instance['recent_title'] : 'Recent Posts';
        $show_recent = ! empty( $instance['show_recent'] ) ? $instance['show_recent'] : true;
        $recent_category = ! empty( $instance['recent_category'] ) ? $instance['recent_category'] : '';
        $recent_tag = ! empty( $instance['recent_tag'] ) ? $instance['recent_tag'] : '';
        $total_posts = ! empty( $instance['total_posts'] ) ? $instance['total_posts'] : '5';
        $fixed_variable_recent = ! empty( $instance['fixed_variable_recent'] ) ? $instance['fixed_variable_recent'] : true;

        ?>
    
        <p>
            <label for="<?php echo $this->get_field_id( 'title' ); ?>">Title (Optional):</label>
            <input type="text" id="<?php echo $this->get_field_id( 'title' ); ?>" name="<?php echo $this->get_field_name( 'title' ); ?>" value="<?php echo esc_attr( $title ); ?>" placeholder="Enter title (optional)" />
        </p>
        <p>
            <input type="checkbox" id="<?php echo $this->get_field_id( 'use_list' ); ?>" name="<?php echo $this->get_field_name( 'use_list' ); ?>" <?php checked($use_list, true); ?> />
            <label for="<?php echo $this->get_field_id( 'use_list' ); ?>">Use List Format</label>
        </p>
        <p>
            <input type="checkbox" id="<?php echo $this->get_field_id( 'show_recent' ); ?>" name="<?php echo $this->get_field_name( 'show_recent' ); ?>" <?php checked($show_recent, true); ?> />
            <label for="<?php echo $this->get_field_id( 'show_recent' ); ?>">Show Recent Posts</label>
        </p>
        <p>
            <label for="<?php echo $this->get_field_id( 'recent_title' ); ?>">Recent Title (Optional):</label>
            <input type="text" id="<?php echo $this->get_field_id( 'recent_title' ); ?>" name="<?php echo $this->get_field_name( 'recent_title' ); ?>" value="<?php echo esc_attr( $recent_title ); ?>" placeholder="Enter recent title (optional)" />
        </p>
        <p>
            <label for="<?php echo $this->get_field_id( 'total_posts' ); ?>">Total Posts to Show:</label>
            <input type="number" id="<?php echo $this->get_field_id( 'total_posts' ); ?>" name="<?php echo $this->get_field_name( 'total_posts' ); ?>" value="<?php echo esc_attr( $total_posts ); ?>" />
        </p>
        <p>
            <input type="checkbox" id="<?php echo $this->get_field_id( 'fixed_variable_recent' ); ?>" name="<?php echo $this->get_field_name( 'fixed_variable_recent' ); ?>" <?php checked($fixed_variable_recent, true); ?> />
            <label for="<?php echo $this->get_field_id( 'fixed_variable_recent' ); ?>">Fixed or Variable</label>            
        </p>        
        <p>
            <label for="<?php echo $this->get_field_id( 'recent_category' ); ?>">Recent Posts Category:</label>
            <input type="text" id="<?php echo $this->get_field_id( 'recent_category' ); ?>" name="<?php echo $this->get_field_name( 'recent_category' ); ?>" value="<?php echo esc_attr( $recent_category ); ?>" />
        </p>
        <p>
            <label for="<?php echo $this->get_field_id( 'recent_tag' ); ?>">Recent Posts Tag:</label>
            <input type="text" id="<?php echo $this->get_field_id( 'recent_tag' ); ?>" name="<?php echo $this->get_field_name( 'recent_tag' ); ?>" value="<?php echo esc_attr( $recent_tag ); ?>" />
        </p>
        <?php
    }

    public function update( $new_instance, $old_instance ) {
        $instance = $old_instance;
        $instance['title'] = strip_tags( $new_instance['title'] );
        $instance['use_list'] = filter_var($new_instance['use_list'], FILTER_VALIDATE_BOOLEAN);
        $instance['show_recent'] = filter_var($new_instance['show_recent'], FILTER_VALIDATE_BOOLEAN);
        $instance['recent_title'] = strip_tags( $new_instance['recent_title'] );
        $instance['recent_category'] = strip_tags( $new_instance['recent_category'] );
        $instance['recent_tag'] = strip_tags( $new_instance['recent_tag'] );
        $instance['total_posts'] = strip_tags( $new_instance['total_posts'] );
        $instance['fixed_variable_recent'] = filter_var($new_instance['fixed_variable_recent'], FILTER_VALIDATE_BOOLEAN);
        return $instance;
    }
}

?>

Adding an AJAX Preview to a WordPress Widget Plugin Tutorial

If you would like to add a preview mechanism to your WordPress plugin, you can use WordPress’ Ajax capabilities. This way, you can make changes in the admin area and preview them on the front end without having to save or reload the page.

In this context, I’ll add an AJAX preview to our plugin which will preview the list of posts in a modal window.

The previous post is: https://horkan.com/2023/08/08/creating-a-wordpress-widget-plugin-tutorial

Modify your plugin’s main PHP file (my_posts_widget.php) as follows:

<?php
/**
 * Plugin Name: My Posts Widget
 * Description: A widget that displays a list of all the posts displayed on the current page.
 * Version: 1.0
 * Author: Your Name
 */

// Register and load the widget
function my_posts_widget_load() {
    register_widget( 'my_posts_widget' );
}
add_action( 'widgets_init', 'my_posts_widget_load' );

// Creating the widget 
class my_posts_widget extends WP_Widget {

    function __construct() {
        parent::__construct(
            'my_posts_widget',
            __('My Posts Widget', 'my_posts_widget_domain'),
            array( 'description' => __( 'A widget that displays a list of all the posts displayed on the current page.', 'my_posts_widget_domain' ), ) 
        );
    }

    // Creating widget front-end
    public function widget( $args, $instance ) {
        global $posts;

        $title = apply_filters( 'widget_title', $instance['title'] );
        
        echo $args['before_widget'];
        if ( ! empty( $title ) )
            echo $args['before_title'] . $title . $args['after_title'];
        
        // this is where we output the posts
        echo '<ul>';
        foreach ($posts as $post) {
            echo '<li><a href="' . get_permalink($post) . '">' . $post->post_title . '</a></li>';
        }
        echo '</ul>';
        echo $args['after_widget'];
    }

    // Widget Backend 
    public function form( $instance ) {
        if ( isset( $instance[ 'title' ] ) ) {
            $title = $instance[ 'title' ];
        }
        else {
            $title = __( 'New title', 'my_posts_widget_domain' );
        }
        // Widget admin form
        ?>
        <p>
        <label for="<?php echo $this->get_field_id( 'title' ); ?>"><?php _e( 'Title:' ); ?></label> 
        <input class="widefat" id="<?php echo $this->get_field_id( 'title' ); ?>" name="<?php echo $this->get_field_name( 'title' ); ?>" type="text" value="<?php echo esc_attr( $title ); ?>" />
        </p>
        <?php 

// Add a Preview button
        ?>
        <p>
            <button id="my-posts-widget-preview-btn" class="button">Preview</button>
            <div id="my-posts-widget-preview"></div>
        </p>
        <?php
    }

    // Updating widget replacing old instances with new
    public function update( $new_instance, $old_instance ) {
        $instance = array();
        $instance['title'] = ( ! empty( $new_instance['title'] ) ) ? strip_tags( $new_instance['title'] ) : '';
        return $instance;
    }
}

add_action( 'admin_footer', 'my_posts_widget_preview_script' );
function my_posts_widget_preview_script() {
    ?>
    <script type="text/javascript" >
    jQuery(document).ready(function($) {
        $('#my-posts-widget-preview-btn').on('click', function(e) {
            e.preventDefault();

            $.ajax({
                url: ajaxurl, // default WP ajax url
                data: {
                    'action': 'my_posts_widget_preview',
                },
                success:function(response) {
                    // Add response in Modal window
                    $('#my-posts-widget-preview').html(response);
                    // You can use any modal plugin or write your own code to display this response in modal
                },
                error: function(error){
                    console.log(error);
                }
            });  

        });
    });
    </script>
    <?php
}

add_action( 'wp_ajax_my_posts_widget_preview', 'my_posts_widget_preview' );
function my_posts_widget_preview() {
    global $posts;

    // Start capturing output
    ob_start();
    
    echo '<ul>';
    foreach ($posts as $post) {
        echo '<li><a href="' . get_permalink($post) . '">' . $post->post_title . '</a></li>';
    }
    echo '</ul>';
    
    // Get current buffer contents and delete current output buffer
    $output = ob_get_clean();

    echo $output;
    
    wp_die(); // All ajax handlers should die when finished
}

The above modification does the following:

  • Adds a Preview button in the widget form that, when clicked, makes an AJAX call to the server.
  • The AJAX call invokes a server-side PHP function (my_posts_widget_preview()) that generates a list of posts and sends it back as the AJAX response.
  • The AJAX response is then inserted into a div for preview.

Please note that for this code to work, AJAX should be properly set up in your WordPress and the admin user should have the right permissions to view the posts.

Remember, this is a very basic preview mechanism and may not reflect exactly how the widget will look on the frontend of your site. Depending on your theme and the styles it applies to widgets, the actual appearance may be different.

You might want to add more advanced features, like a live preview that updates automatically when you change the widget’s settings, or a more accurate representation of the frontend styles. This will require more complex code and a good understanding of both PHP and JavaScript.

Creating a WordPress Widget Plugin Tutorial

I wanted a widget that displays a list of all the posts displayed on the current page, but I couldn’t find a WordPress widget plugin that would do what I wanted. Ergo sum I’ll build it myself. Here’s a super short tutorial on how to create a WordPress widget plugin.

To accomplish this, we’ll create a plugin that registers a widget. This widget will grab the global $posts object from WordPress (which contains the posts that are being displayed on the current page), and list their titles in a widget.

Here’s my template code:

<?php
/**
 * Plugin Name: My Posts Widget
 * Description: A widget that displays a list of all the posts displayed on the current page.
 * Version: 1.0
 * Author: Your Name
 */

// Register and load the widget
function my_posts_widget_load() {
    register_widget( 'my_posts_widget' );
}
add_action( 'widgets_init', 'my_posts_widget_load' );

// Creating the widget 
class my_posts_widget extends WP_Widget {

    function __construct() {
        parent::__construct(
            'my_posts_widget',
            __('My Posts Widget', 'my_posts_widget_domain'),
            array( 'description' => __( 'A widget that displays a list of all the posts displayed on the current page.', 'my_posts_widget_domain' ), ) 
        );
    }

    // Creating widget front-end
    public function widget( $args, $instance ) {
        global $posts;

        $title = apply_filters( 'widget_title', $instance['title'] );
        
        echo $args['before_widget'];
        if ( ! empty( $title ) )
            echo $args['before_title'] . $title . $args['after_title'];
        
        // this is where we output the posts
        echo '<ul>';
        foreach ($posts as $post) {
            echo '<li><a href="' . get_permalink($post) . '">' . $post->post_title . '</a></li>';
        }
        echo '</ul>';
        echo $args['after_widget'];
    }

    // Widget Backend 
    public function form( $instance ) {
        if ( isset( $instance[ 'title' ] ) ) {
            $title = $instance[ 'title' ];
        }
        else {
            $title = __( 'New title', 'my_posts_widget_domain' );
        }
        // Widget admin form
        ?>
        <p>
        <label for="<?php echo $this->get_field_id( 'title' ); ?>"><?php _e( 'Title:' ); ?></label> 
        <input class="widefat" id="<?php echo $this->get_field_id( 'title' ); ?>" name="<?php echo $this->get_field_name( 'title' ); ?>" type="text" value="<?php echo esc_attr( $title ); ?>" />
        </p>
        <?php 
    }

    // Updating widget replacing old instances with new
    public function update( $new_instance, $old_instance ) {
        $instance = array();
        $instance['title'] = ( ! empty( $new_instance['title'] ) ) ? strip_tags( $new_instance['title'] ) : '';
        return $instance;
    }
}

Here’s what’s happening in the code:

  1. We’re creating a new widget with the name “My Posts Widget”. This will appear in the list of available widgets in the WordPress admin dashboard.
  2. The widget has a title which is editable from the widget settings.
  3. In the widget method, we’re accessing the global $posts variable, which WordPress sets with all the posts being displayed on the current page.
  4. We’re then iterating through each of the posts and adding a link to the post in an unordered list.

To install this plugin, you need to:

  1. Create a my-posts-widget directory. The majority of plugins follow the same pattern re: use of “-” to separate words.
  2. Copy the code above and put it in my_posts_widget.php file inside my-posts-widget directory.
  3. Compress the my-posts-widget directory to my-posts-widget.zip.
  4. Go to your WordPress admin dashboard, then go to “Plugins > Add New > Upload Plugin”.
  5. Choose the my-posts-widget.zip file and click “Install Now”.
  6. After installation, activate the plugin by clicking “Activate”.

After you’ve done this, you’ll see a new widget available in your list of widgets called “My Posts Widget”. You can add it to any widget area in your theme like you would with any other widget.

Please note that this plugin will display all posts that are being displayed on the current page, regardless of where they’re displayed. That includes posts in main query, posts in sidebars, posts in footer etc. If you need more precise control, you’ll need to modify the code to suit your needs.

How can you increase software development productivity?

How can you increase software development productivity? ✏️

Without a doubt, and far and beyond the all the other approaches I mention below, the best way to increase software development productivity, is to give people engaging and interesting problems to solve, that feel worth while when they do solve. Nothing kills software development productivity like work that feels like a chore. Motivation is key.

Other approaches to increase software development productivity, including the following strategies are worth considering:

1. Agile methodologies: Adopt agile practices like Scrum or Kanban to enhance collaboration, flexibility, and iterative development.

2. Clear requirements: Ensure well-defined and achievable project requirements to minimize rework and improve efficiency.

3. Automation: Implement automated testing, continuous integration, and deployment pipelines to reduce manual tasks and speed up the development process. DevOps processes are here.

4. Code reviews: Encourage regular code reviews to identify and fix issues early, leading to better code quality.

5. Team communication: Foster effective communication among team members to avoid misunderstandings and enhance coordination.

6. Training and skill development: Invest in training and skill development to keep the team updated with the latest technologies and best practices.

7. Tooling: Use efficient development tools and IDEs that streamline the coding process and boost developer productivity. This includes AI based tooling.

8. Time management: Set realistic deadlines and prioritize tasks to manage time effectively and avoid unnecessary delays.

9. Reduce technical debt: Regularly address technical debt to prevent productivity slowdowns caused by code complexities.

10. Feedback loops: Create feedback loops with stakeholders and end-users to gather insights early and make necessary adjustments.

11. Culture: Encourage teams that work well together and provide leadership that helps and recognises everyone involved.

Remember, increasing productivity is an ongoing process that requires continuous improvement and adaptation to the specific needs of your development team and project.

As Fred Brooks points out in his seminal work, “The Mythical Man Month”, you can’t just throw bodies at a problem.

This article reposted from: https://www.linkedin.com/posts/waynehorkan_how-can-you-increase-software-development-activity-7093053533570088960-j5Xn

The Enigmatic Legacy of Hans Asperger: Unraveling the Threads of Neurodiversity and Controversy

In this article, we delve into the life and research of Hans Asperger, a pivotal figure in the understanding of neurodiversity and psychology. We explore the historical context of his work, including his unfortunate association with the Nazi regime, and its impact on the perception of Asperger’s Syndrome. Furthermore, we examine the evolving diagnosis landscape and suggest alternatives for individuals previously diagnosed with Asperger’s Syndrome.

Continue reading

Resellers and Distributors in the IT Market: Unraveling the Distinctions

In the IT market, resellers and distributors play distinct roles in the supply chain. These differences illustrate the unique roles and functions that resellers and distributors play within the IT market ecosystem.

Resellers

Resellers are companies that purchase products from manufacturers or distributors and then sell them directly to end customers. They typically operate on a smaller scale and focus on specific products or services. Resellers often add value by providing personalized customer support, product expertise, and after-sales services.

  • Purchase products from manufacturers or distributors and sell them directly to end customers.
  • Operate on a smaller scale, often focusing on specific products or services.
  • Provide personalized customer support, product expertise, and after-sales services to end customers.
  • Have direct interactions with the end customers and can tailor solutions to their needs.
  • Typically deal with a limited geographic area or a specific target market.
  • Act as the bridge between the product and the end-user, ensuring a smooth buying experience.

Distributors

Distributors are entities that buy products in bulk from manufacturers and then sell them to resellers or retailers. They act as intermediaries between the manufacturer and the reseller, managing logistics, warehousing, and inventory. Distributors often have a broader reach, supplying products to multiple resellers across different regions.

  • Buy products in bulk from manufacturers and supply them to resellers or retailers.
  • Operate on a larger scale, distributing products to multiple resellers across different regions.
  • Handle logistics, warehousing, and inventory management, reducing the burden on manufacturers.
  • Act as intermediaries between the manufacturer and the reseller, facilitating efficient supply chain management.
  • Offer a broader reach to manufacturers, making their products available in various markets.
  • May provide additional services like marketing support and training for resellers.

Summary

In summary, resellers are closer to the end customers and provide direct sales and support, while distributors handle the distribution and logistics aspects, supplying products to multiple resellers.