A practical guide to safely increasing system-wide audio volume on Windows using Equalizer APO and the LoudMax VST plugin. The article explains how to install and configure both tools to achieve up to 20 dB of additional loudness without clipping or distortion, using true-peak limiting and clean gain staging suitable for everyday listening, gaming, and media consumption.
Contents
- Contents
- Using Equalizer APO + LoudMax (Free, Open Source)
- Requirements
- Step 1: Install Equalizer APO
- Step 2: Verify Equalizer APO Is Active
- Step 3: Download LoudMax (Correct Version)
- Step 4: Install LoudMax
- Step 5: Load LoudMax into Equalizer APO
- Step 6: Configure LoudMax (Safe Defaults)
- Step 7: Set Up the Signal Chain Correctly
- Step 8: Increase Volume the Right Way
- Step 9: Windows Volume Best Practice
- Hearing & Hardware Safety
- Final Result
- Optional Next Steps
- Conclusion
- Important Warning & Disclaimer
Using Equalizer APO + LoudMax (Free, Open Source)
Windows’ built-in volume controls are often not enough — especially with quiet recordings, streaming platforms, games, or low-sensitivity headphones. Simply pushing software volume to 100% usually results in distortion rather than usable loudness.
This guide shows how to safely and transparently increase system-wide volume on Windows using two free tools:
- Equalizer APO – a system-level audio processor that processes all audio output
- LoudMax – a professional-grade true-peak limiter that increases perceived loudness without clipping
Together, they apply clean gain staging and broadcast-style loudness control locally, delivering significant volume increases while preserving audio clarity.
Requirements
- Windows 10 or 11 (64-bit)
- Administrative privileges
- Headphones or speakers connected via:
- Built-in audio (e.g. Realtek)
- USB DAC
- Wired headphones
(Bluetooth may work, but support varies)
Step 1: Install Equalizer APO
Download
Official SourceForge page (use only the official installer):
Warning: Avoid third-party download sites and decline any optional offers during installation.
Installation
- Run the installer
- When the Configurator appears, select the playback device you actually use
(e.g. Headphones – Realtek Audio) - Click OK
- Restart Windows (generally required, though some systems may not prompt for it)
Step 2: Verify Equalizer APO Is Active
- Open Start → Equalizer APO → Configuration Editor
- You should see a default configuration with a Preamp block
- Temporarily set Preamp to
+5 dB - Play audio
If the volume increases, Equalizer APO is working.
Step 3: Download LoudMax (Correct Version)
LoudMax is a freeware professional limiter maintained by Thomas Mundt.
Official site:
Download VST2 Plugin v1.46 for Windows PC 32/64bit
This single ZIP file contains:
LoudMax.dll(32-bit)LoudMax64.dll(64-bit)
You will use LoudMax64.dll
Step 4: Install LoudMax
- Extract the ZIP file
- Copy
LoudMax64.dllto a VST folder, for example:C:\VSTPlugins\LoudMax\
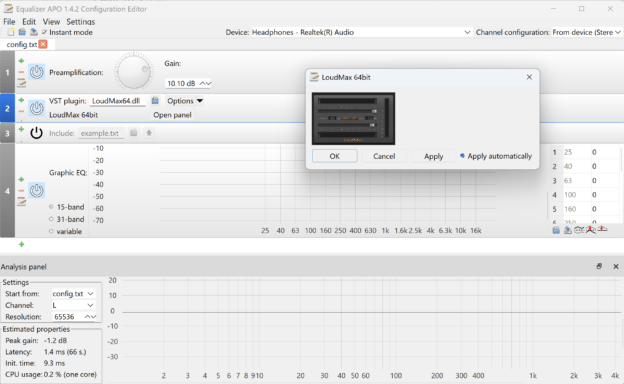
Step 5: Load LoudMax into Equalizer APO
- Open Equalizer APO – Configuration Editor
- Click the green +
- Select Plugins → VST Plugin
- Click Browse
- Select
LoudMax64.dll - Click Open panel
You should now see the LoudMax interface.
Step 6: Configure LoudMax (Safe Defaults)
Set the following options inside LoudMax:
- Link: ON
- ISP (Inter-Sample Peak detection): ON
- Output: –1.2 dB
Leave Threshold alone for now.
Why –1.2 dB?
Even with ISP enabled, true-peak meters can still detect ~0.2 dB overshoot. Setting output slightly lower prevents DAC clipping and downstream distortion.
Step 7: Set Up the Signal Chain Correctly
Your processing order should be:
Preamp
↓
LoudMax
Recommended cleanup
- Remove or disable:
Include: example.txt- Any unused EQ blocks
- Keep the chain minimal for best results
Step 8: Increase Volume the Right Way
You control loudness using the Preamp, not LoudMax’s Output.
Recommended ranges
| Use case | Preamp |
|---|---|
| Everyday listening | +8 to +10 dB |
| Games / movies | +12 dB |
| Maximum boost (use carefully) | +15 dB |
While playing audio:
- Watch LoudMax’s Gain Reduction meter
- Occasional reduction is normal
- Constant heavy reduction means you’re pushing too hard
If audio sounds “squashed” or fatiguing, reduce Preamp by 2–3 dB.
Step 9: Windows Volume Best Practice
- Set Windows volume to 60–80%
- Let Equalizer APO provide the additional headroom
- Avoid running Windows at 100% continuously
Hearing & Hardware Safety
- +10 dB ≈ perceived doubling of loudness
- Sustained levels above ~85 dB can cause hearing damage
- LoudMax prevents clipping — not hearing loss
Increase volume gradually and responsibly, especially with headphones.
Final Result
You now have:
- System-wide loudness control
- True-peak limiting
- Cleaner sound than software “volume boosters”
- Broadcast-grade loudness management using free tools
Optional Next Steps
- Add headphone-specific EQ (with headroom compensation)
- Create multiple APO profiles (music / movies / gaming)
- Tune dialogue clarity without increasing overall volume
- Optimize for USB DACs or studio headphones
Conclusion
When configured correctly, Equalizer APO combined with LoudMax provides a significant increase in system-wide volume while remaining clean, crisp, and transparent, with no perceivable loss of audio quality. Unlike simple software “volume boosters,” this approach uses proper gain staging and true-peak limiting to preserve the character of the original audio while safely extending usable loudness. The result is audio that is not only louder, but clearer and more controlled across music, games, and video.
Important Warning & Disclaimer
Increasing audio volume beyond normal listening levels can cause permanent hearing damage and may damage headphones, speakers, or other audio equipment if used irresponsibly. The techniques described in this article are provided for informational purposes only. You are solely responsible for how you configure and use these tools, and for monitoring safe listening levels at all times. Neither the author nor horkan.com accepts any responsibility for hearing loss, discomfort, or equipment damage resulting from the use or misuse of this configuration.
This configuration is intended to improve audibility and clarity, not to encourage unsafe listening levels.