Monthly Archives: August 2023

Guide to Posting on Twitter based on the 2023 Source Code Disclosure

Twitter has recently made the source code for its recommendation algorithm public, revealing the elements it considers when curating your personalized “For You” timeline.

Let’s delve into the top 10 insights we’ve gained about the Twitter algorithm and the strategies you should employ to achieve virality:

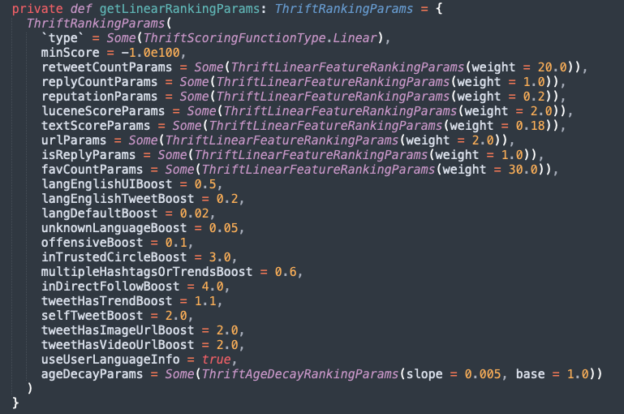
  1. Prioritize Likes: Likes contribute more significantly to your Tweet’s reach than retweets or replies. Aim to create content that encourages your followers to hit the ‘like’ button. This boosts your Tweets by 30x as compared to Retweets (20x boost) or Replies (1x boost).
  2. Maintain a Positive Reputation: Twitter’s algorithm assigns a Reputation Score to your account. Ensure your content isn’t offensive or harmful, as any negative user actions like blocking, reporting, muting, or unfollowing can lead to a downranking of your content.
  3. Minimize Hashtag Use: Excessive use of hashtags can lead to your content being downranked. While hashtags originated on Twitter, it’s recommended to use a maximum of one hashtag per tweet, or none at all, if possible.
  4. Engage with Trending Topics: Posting about current trends can give your content a boost. Be aware of what’s trending and find creative ways to incorporate these topics into your tweets.
  5. Use Visual Media: Adding images or videos to your tweets doubles their visibility according to the algorithm, as compared to text-only content.
  6. Limit External Links: External links in tweets could be flagged as spam, leading to downranking. Unless your content has high engagement, it’s best to limit the use of external links.
  7. Maintain a Healthy Follower-to-Following Ratio: Having a disproportionately low number of followers compared to the number of accounts you follow can lead to a downranking of your account. Unfollow accounts that aren’t relevant to you to maintain a balanced ratio.
  8. Check Your Spelling: Tweets with unrecognized or misspelt words can significantly lower your ranking. Make sure to proofread your tweets before posting.
  9. Stick to Your Niche: The algorithm categorizes accounts based on their content. Posting about topics outside of your typical subject matter can lead to downranking.
  10. Consider Twitter Blue: Twitter Blue subscribers receive a boost of 2-4x on their tweets depending on whether the viewer is in the same network/niche.

    Thanks to this article for the summary: https://genflow.com/blogs/how-the-twitter-algorithm-works-in-2023


Guide to boosting engagement on Twitter

Here are some tips on how to generate engagement on Twitter:

1. Understand Your Audience:

The first step to creating content that your followers will love is to understand who they are and what they want. Use Twitter’s built-in analytics tools to learn more about your followers’ demographics, interests, and online activity patterns. This will help you tailor your posts to your specific audience, increasing the chances of engagement.

2. Create Quality Content:

The quality of your content is one of the most important factors that can increase engagement. Here are a few tips:

  • Use clear and concise language. Tweets are limited to 280 characters, so make every word count.
  • Be timely. Posting about current events, trending topics, or time-sensitive news can boost your visibility.
  • Incorporate relevant hashtags to help users find your content, but avoid hashtag stuffing.
  • Include visuals like images, GIFs, and videos to attract attention. Tweets with visuals typically get more likes and retweets.

3. Engage Directly with Your Audience:

If you want engagement, you need to engage. Respond to comments on your posts, join conversations related to your niche, and don’t hesitate to retweet or like others’ posts. You can also ask questions or create polls to encourage your followers to interact with you.

4. Post Regularly and at the Right Time:

Twitter is a fast-paced platform, and for your content to be seen, you need to post regularly. However, avoid spamming your followers with too many tweets in a short span of time. Use your analytics to understand when your followers are most active and schedule your posts for those times.

5. Use Calls to Action (CTAs):

Don’t be afraid to ask your followers to engage with your posts. Simple CTAs like “Retweet if you agree”, “Like if you found this helpful”, or “Share your thoughts in the comments” can significantly increase engagement.

6. Cross-Promote Your Twitter Account:

Promote your Twitter account on your other social media platforms, website, email newsletters, etc. This can help you reach more people and increase your follower count, which can ultimately lead to more engagement.

7. Utilize Twitter Ads:

If you have the budget, Twitter ads can be a great way to boost visibility and engagement. Twitter offers a variety of ad options, including Promoted Tweets, Follower Ads, and Trend Takeover, which can help you reach a wider audience.

8. Participate in Twitter Chats:

Twitter chats are scheduled, public conversations that happen on Twitter, usually around a specific topic. Participating in Twitter chats related to your niche can help you engage with your community, make new connections, and increase your visibility.

Remember, the key to generating likes, retweets, and engagement on Twitter is to create content that provides value to your audience. Keep your content relevant, engaging, and timely, and you’ll see an increase in engagement in no time.

Posts on Page WordPress Widget Plugin

I was disappointed to find that there wasn’t a “Posts on Page” widget plugin for WordPress. I wanted something that would:

  1. Display a list of all the posts on a page
  2. The title is optional
  3. Also, add “Recent Posts”
  4. Again the recent posts title could be optional
  5. The number of recent posts could be fixed or variable based on the number of posts on the page (I use 5 fixed)
  6. The recent posts could be selected by category, by tag, or by both – so you can effectively add “featured” posts
  7. Display all as a <ul> list (or not)

So I learned how to create a WordPress plugin that creates a widget, there’s a tutorial here: https://horkan.com/2023/08/08/creating-a-wordpress-widget-plugin-tutorial

And then built my own. It should be over there on the right, doing its job.

You can download the widget from here: http://horkan.com/wp-content/uploads/2023/08/posts-on-page-widget.zip

The code is below. I’ll add it to GitHub later.

<?php
/**
 * Plugin Name: Posts on Page Widget
 * Plugin URI: https://horkan.com/posts-on-page-wordpress-widget-plugin 
 * Description: A widget that displays a list of all posts displayed on the current page.
 * Version: 1.0
 * Author: Wayne Horkan
 * Author URI: https://horkan.com
 * License: MIT
 */

 // Register and load the widget
function posts_on_page_widget_load() {
    register_widget( 'Posts_On_Page_Widget' );
}
add_action( 'widgets_init', 'posts_on_page_widget_load' );

class Posts_On_Page_Widget extends WP_Widget {
    public function __construct() {
        $widget_options = array( 
            'classname' => 'posts_on_page_widget',
            'description' => 'This is a plugin developed by Wayne Horkan that displays a list of all posts displayed on the current page.',
        );
        parent::__construct( 'posts_on_page_widget', 'Posts on Page Widget', $widget_options );
    }

    public function widget( $args, $instance ) {

        if(isset($instance['title'])) {
            
            $title = apply_filters( 'widget_title', $instance[ 'title' ] );
            echo $args['before_widget'] . $args['before_title'] . $title . $args['after_title'];
        }

        global $posts;

        if (empty($posts)) {
            $posts = get_posts();
        }

        $total_posts_to_show = count($posts);
        $displayed_posts     = 0;

        if ($instance['use_list']) {
            echo '<ul>';
            foreach ($posts as $post) {
                if($displayed_posts < $total_posts_to_show) {
                    echo '<li><a href="' . get_permalink($post) . '">' . $post->post_title . '</a></li>';
                    $displayed_posts++;
                }
            }
            echo '</ul>';
        } else {
            foreach ($posts as $post) {
                if($displayed_posts < $total_posts_to_show) {
                    echo '<a href="' . get_permalink($post) . '">' . $post->post_title . '</a><br/>';
                    $displayed_posts++;
                }
            }
        }

        if ($instance['fixed_variable_recent']) {

            $total_posts_to_show = isset($instance['total_posts']) ? $instance['total_posts'] : 0; # count($posts);

            if ($total_posts_to_show != 0) {

                $total_posts_to_show = $total_posts_to_show + $displayed_posts; 

            }


        } else {

            $total_posts_to_show = isset($instance['total_posts']) ? $instance['total_posts'] : 0; # count($posts);

            if($displayed_posts < $total_posts_to_show) {

                $total_posts_to_show = $total_posts_to_show - $displayed_posts;

            } else {

                $total_posts_to_show = 0; 
            }

        }

        if($instance['show_recent'] && $displayed_posts < $total_posts_to_show) {
            $recent_posts_args = array(
                'numberposts' => $total_posts_to_show - $displayed_posts,
                'offset' => 0,
                'category' => 0,
                'orderby' => 'post_date',
                'order' => 'DESC',
                'include' => '',
                'exclude' => '',
                'post_status' => 'publish',
                'suppress_filters' => true,
            );

            if(isset($instance['recent_category']) && isset($instance['recent_tag'])) {
                $recent_posts_args['category_name'] = $instance['recent_category'];
                $recent_posts_args['tag'] = $instance['recent_tag'];
            } elseif(isset($instance['recent_category'])) {
                $recent_posts_args['category_name'] = $instance['recent_category'];
            } elseif(isset($instance['recent_tag'])) {
                $recent_posts_args['tag'] = $instance['recent_tag'];
            }

            $recent_posts = wp_get_recent_posts( $recent_posts_args, ARRAY_A );

            echo '<br/>';
            echo '<br/>';
            echo '<br/>';

            if(isset($instance['recent_title'])) {
                $recent_title = $instance['recent_title'];
                echo $args['before_title'] . $recent_title . $args['after_title'];
            } 

            if($instance['use_list']) {
                echo '<ul>';
                foreach ($recent_posts as $post) {
                    echo '<li><a href="' . get_permalink($post['ID']) . '">' . $post['post_title'] . '</a></li>';
                }
                echo '</ul>';
            } else {
                foreach ($recent_posts as $post) {
                    echo '<a href="' . get_permalink($post['ID']) . '">' . $post['post_title'] . '</a><br/>';
                }
            }
        }

        echo $args['after_widget'];
    }

    // Form method
    public function form( $instance ) {
        $title = ! empty( $instance['title'] ) ? $instance['title'] : 'Posts on Page';
        $use_list = ! empty( $instance['use_list'] ) ? $instance['use_list'] : true;
        $recent_title = ! empty( $instance['recent_title'] ) ? $instance['recent_title'] : 'Recent Posts';
        $show_recent = ! empty( $instance['show_recent'] ) ? $instance['show_recent'] : true;
        $recent_category = ! empty( $instance['recent_category'] ) ? $instance['recent_category'] : '';
        $recent_tag = ! empty( $instance['recent_tag'] ) ? $instance['recent_tag'] : '';
        $total_posts = ! empty( $instance['total_posts'] ) ? $instance['total_posts'] : '5';
        $fixed_variable_recent = ! empty( $instance['fixed_variable_recent'] ) ? $instance['fixed_variable_recent'] : true;

        ?>
    
        <p>
            <label for="<?php echo $this->get_field_id( 'title' ); ?>">Title (Optional):</label>
            <input type="text" id="<?php echo $this->get_field_id( 'title' ); ?>" name="<?php echo $this->get_field_name( 'title' ); ?>" value="<?php echo esc_attr( $title ); ?>" placeholder="Enter title (optional)" />
        </p>
        <p>
            <input type="checkbox" id="<?php echo $this->get_field_id( 'use_list' ); ?>" name="<?php echo $this->get_field_name( 'use_list' ); ?>" <?php checked($use_list, true); ?> />
            <label for="<?php echo $this->get_field_id( 'use_list' ); ?>">Use List Format</label>
        </p>
        <p>
            <input type="checkbox" id="<?php echo $this->get_field_id( 'show_recent' ); ?>" name="<?php echo $this->get_field_name( 'show_recent' ); ?>" <?php checked($show_recent, true); ?> />
            <label for="<?php echo $this->get_field_id( 'show_recent' ); ?>">Show Recent Posts</label>
        </p>
        <p>
            <label for="<?php echo $this->get_field_id( 'recent_title' ); ?>">Recent Title (Optional):</label>
            <input type="text" id="<?php echo $this->get_field_id( 'recent_title' ); ?>" name="<?php echo $this->get_field_name( 'recent_title' ); ?>" value="<?php echo esc_attr( $recent_title ); ?>" placeholder="Enter recent title (optional)" />
        </p>
        <p>
            <label for="<?php echo $this->get_field_id( 'total_posts' ); ?>">Total Posts to Show:</label>
            <input type="number" id="<?php echo $this->get_field_id( 'total_posts' ); ?>" name="<?php echo $this->get_field_name( 'total_posts' ); ?>" value="<?php echo esc_attr( $total_posts ); ?>" />
        </p>
        <p>
            <input type="checkbox" id="<?php echo $this->get_field_id( 'fixed_variable_recent' ); ?>" name="<?php echo $this->get_field_name( 'fixed_variable_recent' ); ?>" <?php checked($fixed_variable_recent, true); ?> />
            <label for="<?php echo $this->get_field_id( 'fixed_variable_recent' ); ?>">Fixed or Variable</label>            
        </p>        
        <p>
            <label for="<?php echo $this->get_field_id( 'recent_category' ); ?>">Recent Posts Category:</label>
            <input type="text" id="<?php echo $this->get_field_id( 'recent_category' ); ?>" name="<?php echo $this->get_field_name( 'recent_category' ); ?>" value="<?php echo esc_attr( $recent_category ); ?>" />
        </p>
        <p>
            <label for="<?php echo $this->get_field_id( 'recent_tag' ); ?>">Recent Posts Tag:</label>
            <input type="text" id="<?php echo $this->get_field_id( 'recent_tag' ); ?>" name="<?php echo $this->get_field_name( 'recent_tag' ); ?>" value="<?php echo esc_attr( $recent_tag ); ?>" />
        </p>
        <?php
    }

    public function update( $new_instance, $old_instance ) {
        $instance = $old_instance;
        $instance['title'] = strip_tags( $new_instance['title'] );
        $instance['use_list'] = filter_var($new_instance['use_list'], FILTER_VALIDATE_BOOLEAN);
        $instance['show_recent'] = filter_var($new_instance['show_recent'], FILTER_VALIDATE_BOOLEAN);
        $instance['recent_title'] = strip_tags( $new_instance['recent_title'] );
        $instance['recent_category'] = strip_tags( $new_instance['recent_category'] );
        $instance['recent_tag'] = strip_tags( $new_instance['recent_tag'] );
        $instance['total_posts'] = strip_tags( $new_instance['total_posts'] );
        $instance['fixed_variable_recent'] = filter_var($new_instance['fixed_variable_recent'], FILTER_VALIDATE_BOOLEAN);
        return $instance;
    }
}

?>

Adding an AJAX Preview to a WordPress Widget Plugin Tutorial

If you would like to add a preview mechanism to your WordPress plugin, you can use WordPress’ Ajax capabilities. This way, you can make changes in the admin area and preview them on the front end without having to save or reload the page.

In this context, I’ll add an AJAX preview to our plugin which will preview the list of posts in a modal window.

The previous post is: https://horkan.com/2023/08/08/creating-a-wordpress-widget-plugin-tutorial

Modify your plugin’s main PHP file (my_posts_widget.php) as follows:

<?php
/**
 * Plugin Name: My Posts Widget
 * Description: A widget that displays a list of all the posts displayed on the current page.
 * Version: 1.0
 * Author: Your Name
 */

// Register and load the widget
function my_posts_widget_load() {
    register_widget( 'my_posts_widget' );
}
add_action( 'widgets_init', 'my_posts_widget_load' );

// Creating the widget 
class my_posts_widget extends WP_Widget {

    function __construct() {
        parent::__construct(
            'my_posts_widget',
            __('My Posts Widget', 'my_posts_widget_domain'),
            array( 'description' => __( 'A widget that displays a list of all the posts displayed on the current page.', 'my_posts_widget_domain' ), ) 
        );
    }

    // Creating widget front-end
    public function widget( $args, $instance ) {
        global $posts;

        $title = apply_filters( 'widget_title', $instance['title'] );
        
        echo $args['before_widget'];
        if ( ! empty( $title ) )
            echo $args['before_title'] . $title . $args['after_title'];
        
        // this is where we output the posts
        echo '<ul>';
        foreach ($posts as $post) {
            echo '<li><a href="' . get_permalink($post) . '">' . $post->post_title . '</a></li>';
        }
        echo '</ul>';
        echo $args['after_widget'];
    }

    // Widget Backend 
    public function form( $instance ) {
        if ( isset( $instance[ 'title' ] ) ) {
            $title = $instance[ 'title' ];
        }
        else {
            $title = __( 'New title', 'my_posts_widget_domain' );
        }
        // Widget admin form
        ?>
        <p>
        <label for="<?php echo $this->get_field_id( 'title' ); ?>"><?php _e( 'Title:' ); ?></label> 
        <input class="widefat" id="<?php echo $this->get_field_id( 'title' ); ?>" name="<?php echo $this->get_field_name( 'title' ); ?>" type="text" value="<?php echo esc_attr( $title ); ?>" />
        </p>
        <?php 

// Add a Preview button
        ?>
        <p>
            <button id="my-posts-widget-preview-btn" class="button">Preview</button>
            <div id="my-posts-widget-preview"></div>
        </p>
        <?php
    }

    // Updating widget replacing old instances with new
    public function update( $new_instance, $old_instance ) {
        $instance = array();
        $instance['title'] = ( ! empty( $new_instance['title'] ) ) ? strip_tags( $new_instance['title'] ) : '';
        return $instance;
    }
}

add_action( 'admin_footer', 'my_posts_widget_preview_script' );
function my_posts_widget_preview_script() {
    ?>
    <script type="text/javascript" >
    jQuery(document).ready(function($) {
        $('#my-posts-widget-preview-btn').on('click', function(e) {
            e.preventDefault();

            $.ajax({
                url: ajaxurl, // default WP ajax url
                data: {
                    'action': 'my_posts_widget_preview',
                },
                success:function(response) {
                    // Add response in Modal window
                    $('#my-posts-widget-preview').html(response);
                    // You can use any modal plugin or write your own code to display this response in modal
                },
                error: function(error){
                    console.log(error);
                }
            });  

        });
    });
    </script>
    <?php
}

add_action( 'wp_ajax_my_posts_widget_preview', 'my_posts_widget_preview' );
function my_posts_widget_preview() {
    global $posts;

    // Start capturing output
    ob_start();
    
    echo '<ul>';
    foreach ($posts as $post) {
        echo '<li><a href="' . get_permalink($post) . '">' . $post->post_title . '</a></li>';
    }
    echo '</ul>';
    
    // Get current buffer contents and delete current output buffer
    $output = ob_get_clean();

    echo $output;
    
    wp_die(); // All ajax handlers should die when finished
}

The above modification does the following:

  • Adds a Preview button in the widget form that, when clicked, makes an AJAX call to the server.
  • The AJAX call invokes a server-side PHP function (my_posts_widget_preview()) that generates a list of posts and sends it back as the AJAX response.
  • The AJAX response is then inserted into a div for preview.

Please note that for this code to work, AJAX should be properly set up in your WordPress and the admin user should have the right permissions to view the posts.

Remember, this is a very basic preview mechanism and may not reflect exactly how the widget will look on the frontend of your site. Depending on your theme and the styles it applies to widgets, the actual appearance may be different.

You might want to add more advanced features, like a live preview that updates automatically when you change the widget’s settings, or a more accurate representation of the frontend styles. This will require more complex code and a good understanding of both PHP and JavaScript.

Creating a WordPress Widget Plugin Tutorial

I wanted a widget that displays a list of all the posts displayed on the current page, but I couldn’t find a WordPress widget plugin that would do what I wanted. Ergo sum I’ll build it myself. Here’s a super short tutorial on how to create a WordPress widget plugin.

To accomplish this, we’ll create a plugin that registers a widget. This widget will grab the global $posts object from WordPress (which contains the posts that are being displayed on the current page), and list their titles in a widget.

Here’s my template code:

<?php
/**
 * Plugin Name: My Posts Widget
 * Description: A widget that displays a list of all the posts displayed on the current page.
 * Version: 1.0
 * Author: Your Name
 */

// Register and load the widget
function my_posts_widget_load() {
    register_widget( 'my_posts_widget' );
}
add_action( 'widgets_init', 'my_posts_widget_load' );

// Creating the widget 
class my_posts_widget extends WP_Widget {

    function __construct() {
        parent::__construct(
            'my_posts_widget',
            __('My Posts Widget', 'my_posts_widget_domain'),
            array( 'description' => __( 'A widget that displays a list of all the posts displayed on the current page.', 'my_posts_widget_domain' ), ) 
        );
    }

    // Creating widget front-end
    public function widget( $args, $instance ) {
        global $posts;

        $title = apply_filters( 'widget_title', $instance['title'] );
        
        echo $args['before_widget'];
        if ( ! empty( $title ) )
            echo $args['before_title'] . $title . $args['after_title'];
        
        // this is where we output the posts
        echo '<ul>';
        foreach ($posts as $post) {
            echo '<li><a href="' . get_permalink($post) . '">' . $post->post_title . '</a></li>';
        }
        echo '</ul>';
        echo $args['after_widget'];
    }

    // Widget Backend 
    public function form( $instance ) {
        if ( isset( $instance[ 'title' ] ) ) {
            $title = $instance[ 'title' ];
        }
        else {
            $title = __( 'New title', 'my_posts_widget_domain' );
        }
        // Widget admin form
        ?>
        <p>
        <label for="<?php echo $this->get_field_id( 'title' ); ?>"><?php _e( 'Title:' ); ?></label> 
        <input class="widefat" id="<?php echo $this->get_field_id( 'title' ); ?>" name="<?php echo $this->get_field_name( 'title' ); ?>" type="text" value="<?php echo esc_attr( $title ); ?>" />
        </p>
        <?php 
    }

    // Updating widget replacing old instances with new
    public function update( $new_instance, $old_instance ) {
        $instance = array();
        $instance['title'] = ( ! empty( $new_instance['title'] ) ) ? strip_tags( $new_instance['title'] ) : '';
        return $instance;
    }
}

Here’s what’s happening in the code:

  1. We’re creating a new widget with the name “My Posts Widget”. This will appear in the list of available widgets in the WordPress admin dashboard.
  2. The widget has a title which is editable from the widget settings.
  3. In the widget method, we’re accessing the global $posts variable, which WordPress sets with all the posts being displayed on the current page.
  4. We’re then iterating through each of the posts and adding a link to the post in an unordered list.

To install this plugin, you need to:

  1. Create a my-posts-widget directory. The majority of plugins follow the same pattern re: use of “-” to separate words.
  2. Copy the code above and put it in my_posts_widget.php file inside my-posts-widget directory.
  3. Compress the my-posts-widget directory to my-posts-widget.zip.
  4. Go to your WordPress admin dashboard, then go to “Plugins > Add New > Upload Plugin”.
  5. Choose the my-posts-widget.zip file and click “Install Now”.
  6. After installation, activate the plugin by clicking “Activate”.

After you’ve done this, you’ll see a new widget available in your list of widgets called “My Posts Widget”. You can add it to any widget area in your theme like you would with any other widget.

Please note that this plugin will display all posts that are being displayed on the current page, regardless of where they’re displayed. That includes posts in main query, posts in sidebars, posts in footer etc. If you need more precise control, you’ll need to modify the code to suit your needs.

How can you increase software development productivity?

How can you increase software development productivity? ✏️

Without a doubt, and far and beyond the all the other approaches I mention below, the best way to increase software development productivity, is to give people engaging and interesting problems to solve, that feel worth while when they do solve. Nothing kills software development productivity like work that feels like a chore. Motivation is key.

Other approaches to increase software development productivity, including the following strategies are worth considering:

1. Agile methodologies: Adopt agile practices like Scrum or Kanban to enhance collaboration, flexibility, and iterative development.

2. Clear requirements: Ensure well-defined and achievable project requirements to minimize rework and improve efficiency.

3. Automation: Implement automated testing, continuous integration, and deployment pipelines to reduce manual tasks and speed up the development process. DevOps processes are here.

4. Code reviews: Encourage regular code reviews to identify and fix issues early, leading to better code quality.

5. Team communication: Foster effective communication among team members to avoid misunderstandings and enhance coordination.

6. Training and skill development: Invest in training and skill development to keep the team updated with the latest technologies and best practices.

7. Tooling: Use efficient development tools and IDEs that streamline the coding process and boost developer productivity. This includes AI based tooling.

8. Time management: Set realistic deadlines and prioritize tasks to manage time effectively and avoid unnecessary delays.

9. Reduce technical debt: Regularly address technical debt to prevent productivity slowdowns caused by code complexities.

10. Feedback loops: Create feedback loops with stakeholders and end-users to gather insights early and make necessary adjustments.

11. Culture: Encourage teams that work well together and provide leadership that helps and recognises everyone involved.

Remember, increasing productivity is an ongoing process that requires continuous improvement and adaptation to the specific needs of your development team and project.

As Fred Brooks points out in his seminal work, “The Mythical Man Month”, you can’t just throw bodies at a problem.

This article reposted from: https://www.linkedin.com/posts/waynehorkan_how-can-you-increase-software-development-activity-7093053533570088960-j5Xn

The Enigmatic Legacy of Hans Asperger: Unraveling the Threads of Neurodiversity and Controversy

In this article, we delve into the life and research of Hans Asperger, a pivotal figure in the understanding of neurodiversity and psychology. We explore the historical context of his work, including his unfortunate association with the Nazi regime, and its impact on the perception of Asperger’s Syndrome. Furthermore, we examine the evolving diagnosis landscape and suggest alternatives for individuals previously diagnosed with Asperger’s Syndrome.

Continue reading